Photographs by Frank

19 April 2021

Dodging and Burning

Warning… photographer talk ahead!!!

Dodging and burning are terms that describe making local adjustments to a photograph during the making of a print. Dodging is the process of selectively lightening an area. Burning is the opposite; selective darkening.

In the days of yore, when working in the darkroom, dodging and burning were done one print at a time. One manipulated the light falling on the photographic paper as one exposed the print. Master printers were able to make these adjustments with a fair amount of precision, but there was always some print-to-print variability even with the best printers.

For the UV sensitive contact printing processes (e.g. cyanotype, salted-paper printing, et al.), dodging and burning were not practical for a number of reasons. The main one being that there is necessarily little space between the light source and the print. Thus one’s ability to see where you were attempting to dodge or burn was limited and thus imprecise.

Using digital negatives to make contact prints has changed all of this. By making adjustments to the digital file we can make very localized adjustments that are “frozen” when one make the digital negative. Thus, one gets the same adjustments in each print when one makes a contact print. Furthermore, since those adjustments are made in the negative, one can apply them to the UV sensitive contact printing processes without the need to actually get one’s hands in the space between the light and the paper.

With experience, one’s first draft of a digital negative is usually pretty close to ideal, but after one makes that first print from a negative you often see that a small amount of fine tuning is necessary. Thus, one goes back to the computer to make a few tweaks to the image before printing a revised negative and making another print. I probably make second drafts of about half of my negatives. It is very rare that I need to make a third draft these days.

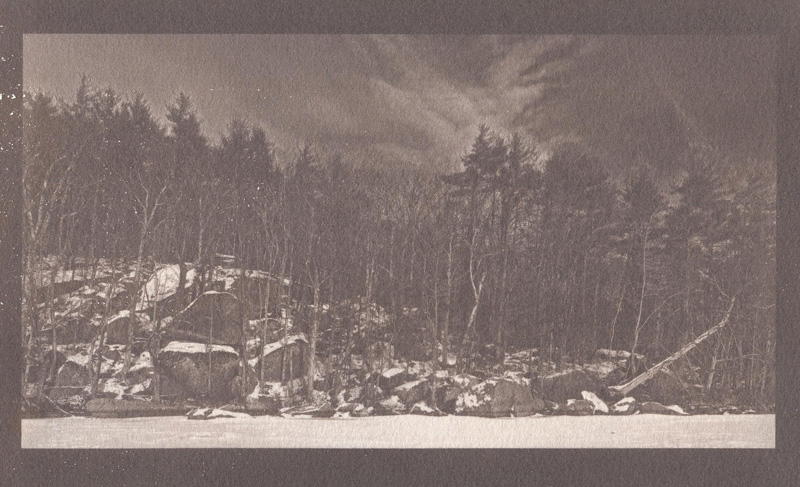
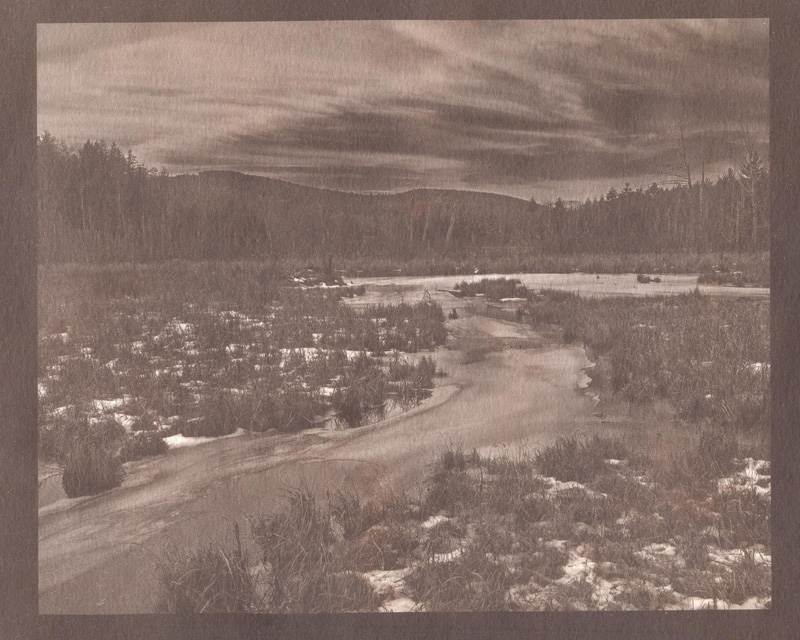
The four images show below are examples of the end result of this process. I had made initial prints of these images previously but each of them needed a bit or dodging and burning to be ‘perfect’. I made those adjustments and printed new negatives on Saturday. Yesterday, I made new salted-paper prints using those negatives.

The differences between the two drafts were small. A bit of burning in (darkening) on the shoulder of the marmot. Similar adjustments on the lily pad in the second photo and the dead tree to the right of the gate in the last photo.. The third image had a bit of dodging (lightening) of the pinecone and a bit burning in of the lightest leaves throughout.

The resulting prints are, to my eye, subtly but significantly improved over the initial prints.

[scrollGallery id=765 – autoscroll = false width = 600 height = 600 useCaptions = true]

5 March 2021

Missouri River Homestead

Filed under: Alternative Processes,Landscapes,Salted-paper Prints — Frank @ 11:03 AM

The end of September 2017… Joan and I had left Yellowstone National Park via the northeast corner of the park and Cooke City. We were headed north through central Montana; our eventual goal was Malta.

After spending a night in Roundup, we continued on our way north. We made an unscheduled and very productive stop at the CM Russell National Wildlife Refuge where US191 crosses the Missouri River. There is a wildlife drive through the refuge on the north side of the river here.

In addition to river access, this gravel road is a hot spot for viewing elk during rutting season, i.e. at the end of September! However, this post is not about those photos!

Rather, this post is about the photos I made of an old river bottom homestead that is a short walk off the refuge road; I wrote about this site and showed the photos I made back in 2017.

Recently, I revisited these photos as I thought they would be good candidates for warm tones of salted-paper prints, an old, so called “alternative” photographic process. Or, in the words of Mike Johnston of The Online Photographer, an “ancient but still unconventional medium”. (Said about cyanotype, but equally applicable here!) I wrote about this process a couple of weeks ago when I made my first salted-paper print.

On Wednesday, I finished making salted-paper prints of nine photographs of this riverine homestead. The prints are 4″x5″ on Hahnemuhle Platinum Rag paper and are untoned. The scans I show here are a inadequate representation of the actual artifacts. The prints really need to be seen and held to fully experience, but in these days of COVID this will have to suffice for now.

I am planning to make a set of larger prints, but I am still mulling over how large. I have the trays needed to make prints on 11×14 inch paper (i.e. an image size of about 8×10 inches. However, I’m not sure that I have the space needed.

I would really like to make 11×14 inch prints but I have neither trays large enough nor a large enough space for all of the trays needed. The cost of the chemicals also becomes a factor in making large prints. An 11×14 image is almost eight times the area of a 4×5 image and thus requires eight times the chemicals.

I’m thinking that I should work out the mechanics of making large prints with cyanotype before attempting prints involving silver! I’ll probably have to also wait for warmer weather when I can set up tables for trays in the garage… we’ll see!

Anyway, here are the 4×5 inch prints:

[scrollGallery id=758 – autoscroll = false width = 600 height = 600 useCaptions = true]

19 February 2021

A Response to Joe’s Questions

In his comment on my “first salted-paper print” post, my friend Joe raises some interesting questions (in italics below). I thought that I would reply publically here rather than in an email to him alone.

So, do you prefer this process to your cyanotypes?

It is not so much as preferring one process over another. Rather the key, I think is to fit the photograph to the process and to the “mood” (aesthetic?) that one wishes to convey.

And, for me, why?

I think that I can answer this on many levels. The fun of learning and hopefully mastering something new. Having another tool for artistic expression. Or to paraphrase Sir Edmund Hillary… “Because I can”!


You have a good image that would be a great print via the usual ways of printing.

It is interesting that you raise this point. Back a month or so ago, as I was setting up a printer with Piezography Pro inks, I make prints of this series of photographs using the “full warm” inks*. These prints (scans shown below), on a satin paper, are very nice but not as ‘special’ as the salted-paper prints.

[scrollGallery id=757 – autoscroll = false width = 600 height = 600 useCaptions = true]


* The Piezography Pro system modifies an Epson printer to use only black/gray inks. The inkset consists of two sets of four inks. One set is warm toned and one is cool toned. The software allows one to mix the two set of inks to arrive at a final print of any tone in between, including dead neutral, if that is the desired result.

18 February 2021

First Salted-Paper Print

Filed under: Alternative Processes,Landscapes,Salted-paper Prints — Frank @ 11:30 PM

I’m excited!

After much reading and gathering of supplies, I spent this afternoon and evening making my first salted-paper prints*.

Salted-paper printing is the progenitor of all of modern (film-based) photography. The process was invented in the 1830’s by Henry Fox Talbot and announced at the Royal Society in London at the end of January 1839, a few weeks after the Daguerreotype was announced in Paris. Both processes lay claim to being the “invention of photography”.

The salted-paper process is deceptively simple, one begins by soaking paper in salt water. After the paper is dry one makes it light sensitive by coating the salted-paper with a solution of silver nitrate.

When the sensitized paper is dry one exposes the paper to ultraviolet light through a negative. Traditionally the sun is used as a light source. I used the same exposure box containing blacklight LEDs that I use for cyanotype. Upon exposure, an image ‘magically’ appears on the paper, fully formed.

One then processes the paper through a number of solutions to remove the unreacted silver making the print stable to further exposure to light.

The procedure I used is essentially that described in Chapter 5 of Christina Anderson’s book “Salted Paper Printing/ A Step-By-Step Manual Highlighting Contemporary Artists“. I used a 4×5 inch digital negative and printed on Hahnemuhle Platinum Rag paper as it came from the mill (i.e. I did not size the paper.) The prints are untoned.

I made four prints today using two different negatives. Shown below is the very first print I made. The others are still too wet to be scanned, so I can’t show them yet!

[scrollGallery id=755 – autoscroll = false width = 600 height = 600 useCaptions = true]

* Well, this is not precisely true. I made a few salted-paper prints at a workshop I attended maybe 15 years ago. But that is not anything close to making prints in your own dimroom. I have no idea what has become of the prints I made back then. I must have decided that they were not worth keeping.

1 January 2021

Adams Dozen — 2020

Filed under: Adams Dozen — Frank @ 2:30 PM

As has been my longstanding habit*, here is my “Adams Dozen” for 2020… the year of the pandemic.

Being retired and living a generally quiet life in the New Hampshire woods, our life has not been changed nearly as much as many others have. We made no big trips this year, but I still got out in the neighborhood regularly to make photographs**.

One of the highlights of this year was the successful nesting of a pair of loons on Gregg lake; the first in living memory. I spent many enjoyable hours back in May and June watching (and photographing) the nesting adults and then the pair of chicks, that joined them. Both juveniles successfully fledged this fall and headed to the ocean.

You will be glad to know that I have included only one loon photo and a single dragonfly photo among the dozen… there are many, many more of each subject in this year’s collection!

Additionally, I used some of my “home time” this summer to start making cyanotypes again (after a twelve year hiatus). This fall I also experimented with hand coloring black and white prints. I intend to keep making both type of prints in the future.

[scrollGallery id=750 – autoscroll = false width = 600 height = 600 useCaptions = true]

* The first edition (from 2011) explains the genesis of this tradition and here is last year’s edition.

** For those keeping track, I made 6651 exposures in 2020 (about two-thirds of what I made in 2019) and processed 1037 of these (about 15% of the total) which is about average.

19 December 2020

Steel, Stone and Wood

Filed under: Alternative Processes,Cyanotype — Frank @ 10:00 PM

I haven’t made any cyanotypes in about a month. It has been too cold in my basement “dim room”; about 45 degrees. A few days ago the house was chilly enough that we started the basement stove and suddenly it was warm enough in the basement to work again.

I printed three 4×5 inch negatives from exposures I made several weeks ago, coated some 5×7 inch Rives BFK paper and made these prints.

It is satisfying to be at a place with the cyanotype process that I can get nice prints without much fussing about. I am not sure that I ever got to that point my first “go round” with cyanotype a dozen plus years ago.

[scrollGallery id=746 – autoscroll = false width = 600 height = 600 useCaptions = true]

24 November 2020

2020 Winter Solstice Print

Filed under: Alternative Processes,Cyanotype,Winter Solstice Prints — Frank @ 9:00 PM

I don’t think that I have posted here before about my tradition of sending a print to friends and family in celebration of the winter solstice.

I am early this year because I was a bit nervous about having to print so many copies of a single print via a “wet” process. However, I was able to make twenty successful copies (on 5×7 inch paper) of this print in one long dim room session. I took prints to the post office yesterday.

The following is the photo (and accompanying text) that comprise the 2020 version of this tradition:

David Vestal (1924-2013) was a well-known photographer, critic and teacher. For many years he sent friends and family a small holiday print.  In 2013 I decided to begin a similar tradition. The print you have in front of you is my eighth “Winter Solstice Print”.

At the end of each year, I choose a photograph made during the preceding year; one that, I think, turned out well. I expect that most will not have a holiday, or even a winter, theme.  I make a dozen or so small prints and send them to folks whom I think might enjoy them. I do not keep a list of those receiving each year’s print and expect to send prints to a different selection of folks each year. Thus, do not be offended if you do not receive a print every year!

This year’s print, a cyanotype, is titled “Jane’s Barn”. The exposure was made on 6 April 2020.

I was headed back towards the house on my (allegedly) daily walk. The bright midday sun sharply illuminated this view of the back of our neighbor’s barn through the still leafless trees. It is a scene that I had passed by hundreds of times, but had never photographed.

Cyanotype is a photographic process invented in 1842 by Sir John Herschel. In this “year of the virus” I have taken up making cyanotypes after a hiatus of about a dozen years. It took me roughly a month back in April to work out all of the details of making prints in my basement “dim room”.

The cyanotype process involves painting a lemon-yellow solution of iron salts onto paper – Fabriano Tiepolo (130 gsm) in this case. Once the paper is dry, it is sandwiched with a negative in a contact-printing frame and exposed to ultraviolet light. Traditionally, the sun was used as the UV source. However, I use a homemade UV light box containing “black light” LEDs. Exposures take several minutes. These days, I work exclusively with inkjet negatives prepared from digital files and printed onto a clear film.

A pigment (Prussian blue) is formed via the action of the light on the iron compounds, producing the image. The exposed paper is washed free of the unexposed iron salts and dried to give the print you now hold.

[scrollGallery id=741 – autoscroll = false width = 600 height = 600 useCaptions = true]

30 April 2020

April Photos

Filed under: Early Spring,Landscapes,Monadnock Region — Frank @ 6:03 PM

Here it is the end of April and I have not posted any new photos since the 10th of March. Early spring is usually a slow time for me photographically, but this year given the pandemic, has been especially slow.

I have been spending much of my time thinking about and making cyanotypes and I continue to do this. I have made some new photographs in April mostly by taking a camera with me on my regular walks around the area, although I did not download any files off the camera until today.

So, here are ten photos made in April… the earliest from the 6th and the most recent from the 28th. They are displayed in chronological order below.

[scrollGallery id=699 – autoscroll = false width = 600 height = 600 useCaptions = true]

15 April 2014

Van Dyke Brown Prints

Filed under: Alternative Processes,Van Dyke — Frank @ 1:00 PM

Sunday, I attended a small workshop on Van Dyke printing at the Vermont Center for Photography. I spent an enjoyable afternoon learning a new alternative process.

The Van Dyke process is  very similar in many ways to cyanotype but yields a nice chocolaty brown print instead of the blue of cyanotype. It is an iron-based process (like cyanotype) in which the photoreduction of  iron  is used to drive the reduction of silver which actually forms the image.

I sent three files to the instructor (Bill Dixon) ahead of time and he prepared very nice digital negatives from them.

Scans of the resulting prints are shown below… pretty good for a first attempt, if I do say so myself!

I have all of the chemicals needed to try this at home… now I just need to find some time!


26 August 2013

Making Cameras, Not Photographs

Filed under: Off Topic — Tags: — Frank @ 6:00 PM

The language we use to describe photography is sometimes quite curious… most folks talk about “taking” photographs. “Taking”, in my view, is not the correct word. One implication of  “taking” is that something (maybe the subject of the photo?) is diminished in the act… if I take candy from the baby, the baby lacks candy, if I take a photo of the same baby, she or he looses nothing!

The proper phrase for the act of tripping the shutter is “making a photograph” as this is inherently an act of creation. I am not sure that I have been successful in convincing any of my circle of  photography acquaintances in changing their use of the language, but I’ll keep using “make”, not “take” in this regard. I’ll keep tilting at windmills too!*

Oh well… back to the main act.

I note that, again, have not written a blog entry in over a week. This is because I have been spending time making photographic apparati rather than making photos.

First, I decided that it might be worthwhile to stabilize the relationship between camera and lens in the apparatus I described a week, or so ago in “Experiments in Optics“. The result is show in the first photo below and the four photos following are test shots from around the yard. Now all I have to do is find some time and energy (it is heavy!) to take it further afield. (Kevin… I’ll definitely try some flowing water.)

In addition to this decidedly nonstandard photographic contraption, I also spent a couple of days constructing a classic sliding box camera for 4″x5″ film. I used another old lens I had lying around; an 6.5” f/4 doublet with an aperture but no shutter. I have no clue as to its former life. Instead of ground glass for the back, I used a piece of an el cheapo (2 for 99 cents at Ocean State Job Lot) plastic chopping mat. These are textured on one side and smooth and shiny on the other and one can form an image on it just like ground glass.

In action, the ground glass and its frame get replaced with a film holder that I forgot to take make a photograph of of this blog article.

The last two photos below show “Big Red”.

Now comes the big step…  setting up a darkroom. Fortunately I won’t  need anything too fancy if I stick to lith film. I figure that I’ll use the negatives to make cyanotypes and maybe, eventually, silver contact prints. We’ll see if I follow through. Setting up a dark room from scratch in the 21st century… I must be nuts! Stay tuned!

[scrollGallery id=220 autoscroll = false width = 600 height = 600 useCaptions = true]


*When I was teaching, I used to tilt at another, similar windmill.

Both students and faculty invariably use the word  “give” when it comes to grades. I gave Sally a B on the last test. Professor Jones gave me a B in biochemistry. Wrong!

On the first day of each semester, I would announce to my students that I had never, ever, ever, never given a grade in my teaching career. Invariably, this led to many puzzled looks. Only some of the puzzled looks disappeared when I continued by saying that the grades in my courses are  earned by the students.

For years, I would bring up this issue of proper language around grades with my windmills faculty colleagues. I never got very far there either!

« Newer PostsOlder Posts »

Powered by WordPress